
Introduction
Making calls on the Yealink T33G is simple, whether you’re setting up your first VoIP phone or switching from another model. This beginner-friendly guide will walk you through everything from setup to advanced call management, ensuring you get the most out of your Yealink T33G.
With clear instructions and troubleshooting tips, you’ll master calling, transferring, and forwarding in no time. Ready to get started? Let’s dive in!
2. Setting Up the Yealink T33G
Before making calls on the Yealink T33G, ensure it is correctly set up:
- Unbox and connect: Plug in the handset, Ethernet cable, and power adapter.
- Power on the device: If using PoE, the phone will power on automatically.
- Check network connectivity: Ensure your phone is connected to the internet.
3. Configuring VoIP Settings
To start making calls on the Yealink T33G, configure its VoIP settings:
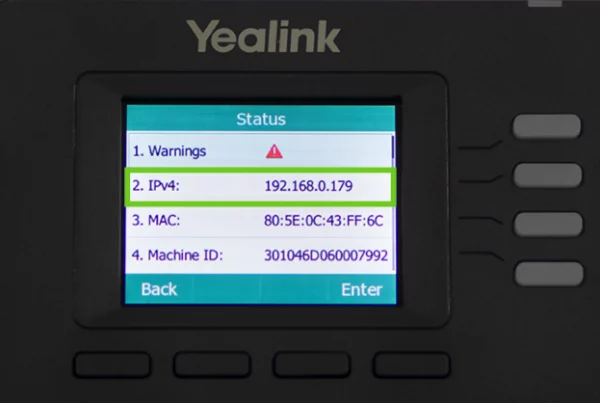
- Enter the phone’s web interface via its IP address.
- Log in using the default credentials (admin/admin unless changed).
- Navigate to Account Settings and enter your VoIP provider’s details.
- Save and apply the settings.
For a detailed guide, check the Yealink T33G user manual.
4. Making a Call on the Yealink T33G
There are three ways to make a call on the Yealink T33G:
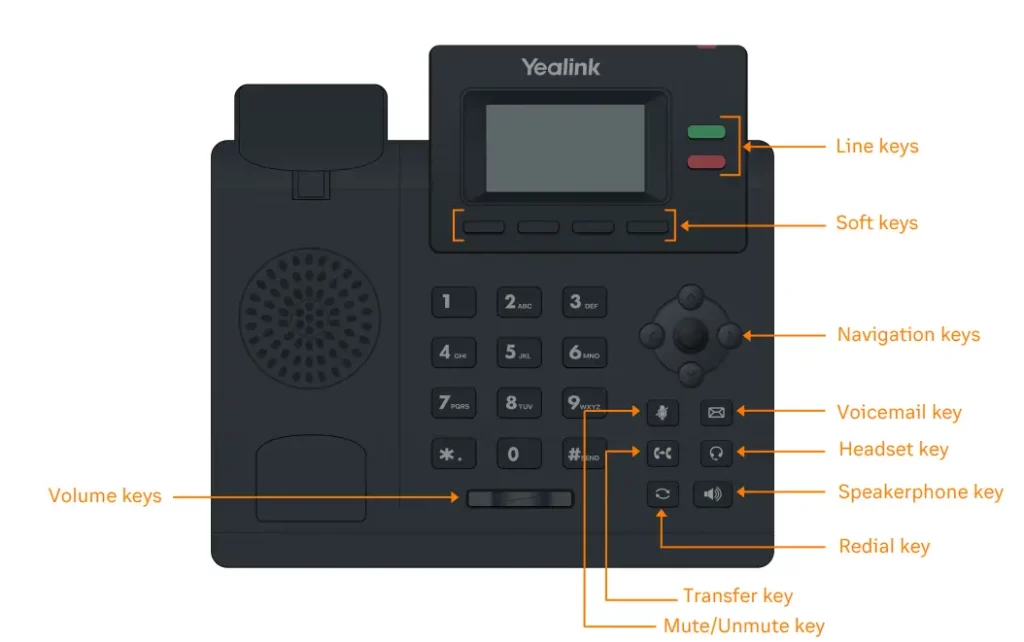
- Using the handset: Pick up the handset and dial the number.
- Using the speakerphone: Press the speaker button and enter the number.
- Using a headset: If connected, press the headset button and dial.
Press Send to start the call.
5. Managing Call Controls
During calls, you can use various features:
- Mute/Unmute: Press the mute button to silence your microphone.
- Volume Control: Adjust call volume using the volume buttons.
- Hold: Pause a call by pressing the hold button.
6. Transferring Calls
Easily transfer calls on the Yealink T33G:
- Attended Transfer: Speak with the recipient before transferring.
- Blind Transfer: Transfer the call without speaking to the recipient.
Press Transfer, dial the recipient’s number, and press Send.
7. Setting Up Call Forwarding
To ensure calls reach you even when unavailable:
- Press Menu and go to Features > Call Forward.
- Choose from Always, Busy, or No Answer forwarding.
- Enter the forwarding number and save.
8. Troubleshooting Call Issues
If you’re having trouble making calls on the Yealink T33G, try these solutions:
- No dial tone? Check cable connections.
- Dropped calls? Ensure your internet connection is stable.
- Poor call quality? Adjust VoIP bandwidth settings.
For more help, visit the Yealink T33G troubleshooting guide.
Lorem ipsum dolor sit amet, consectetur adipiscing elit. Ut elit tellus, luctus nec ullamcorper mattis, pulvinar dapibus leo.
9. Enhancing Call Quality
Improve your call experience with these tips:
- Use a high-speed internet connection.
- Minimize background noise.
- Update your phone’s firmware regularly.
10. Exploring Additional Voice Features
The Yealink T33G includes features that enhance communication:
- Call Waiting: Get notified of incoming calls while on another call.
- Voicemail Access: Retrieve voicemails quickly.
- Do Not Disturb (DND): Block calls when you’re unavailable.
11. Conclusion
Making calls on the Yealink T33G is simple with the right setup and knowledge. Whether you’re dialing, transferring, or forwarding calls, this guide ensures you make the most of your Yealink T33G. Need a new device? You can shop Yealink T33G today.
12. FAQs
Item content. Click the edit button to change this text.
Check your VoIP settings, internet connection, and SIP account registration.
Yes, as long as the provider supports the SIP protocol.
Press the Message button and follow the voice prompts.
You can shop Yealink T33G on Promallshop.