
Introduction
Installation of the Logitech Scribe might seem straightforward, but there are key steps that, if overlooked, can lead to frustrating issues. Whether you’re a first-time user or have prior experience with tech installations, this guide is designed to help you get the most out of your Logitech Scribe. By focusing on best practices and highlighting common mistakes, you’ll ensure a smooth installation process.
In this article, we’ll dive into practical tips, offer troubleshooting advice, and provide an in-depth understanding of how to optimize your Logitech Scribe setup.
Table of Contents
- Introduction
- Understanding the Logitech Scribe and Its Benefits
- Preparing for Installation: What You’ll Need
- Logitech Scribe Installation Guide: Step-by-Step Instructions
- Logitech Scribe Mounting Tips: Positioning for Best Results
- Avoiding Common Logitech Scribe Errors
- Logitech Scribe Calibration Tips: Getting the Perfect View
- Logitech Scribe Troubleshooting Advice
- Logitech Scribe Integration Tips: Connecting with Other Systems
- Logitech Scribe Software Configuration
- Wrapping Up: Best Practices and Final Thoughts
- Conclusion
- FAQs
Understanding the Logitech Scribe and Its Benefits
The Logitech Scribe is a game-changer in the world of video conferencing and remote learning. This device is designed to share whiteboard content clearly in virtual meetings, making it ideal for both business and education settings. But like any technology, the effectiveness of the Scribe depends on a proper setup. So, let’s make sure you get it right from the start.
Preparing for Installation: What You’ll Need
Before diving into the installation of the logitech scribe, ensure you have everything ready. Here’s a checklist to keep things organized:
- Logitech Scribe Device
- Mounting hardware (included in the package)
- A compatible whiteboard
- Stable internet connection
- Power source near the installation area
- Laptop or desktop for configuration
Having these items on hand will make the process smoother and help you avoid unnecessary delays.

Logitech Scribe Installation Guide: Step-by-Step Instructions
Setting up the Logitech Scribe is simpler when you break it down into steps:
- Unbox and Inspect: Start by unboxing the Scribe and ensuring all components are intact. Double-check that you have the mounting kit, power adapter, and cables.
- Positioning the Device: Choose a central spot on your whiteboard where the camera can capture the entire board without obstructions.
- Mount the Scribe: Using the provided hardware, mount the device securely on your whiteboard. Ensure it is level and aligned properly. An uneven installation can lead to skewed images.
- Connect the Cables: Plug in the power and Ethernet cables. The Scribe should connect seamlessly to your network, but make sure the cables are neatly arranged to avoid any tangling issues.
- Software Setup: Install the Logitech Scribe app on your computer and follow the prompts to pair the device with your system.
This step-by-step guide covers the essentials, ensuring a smooth setup without any hiccups.
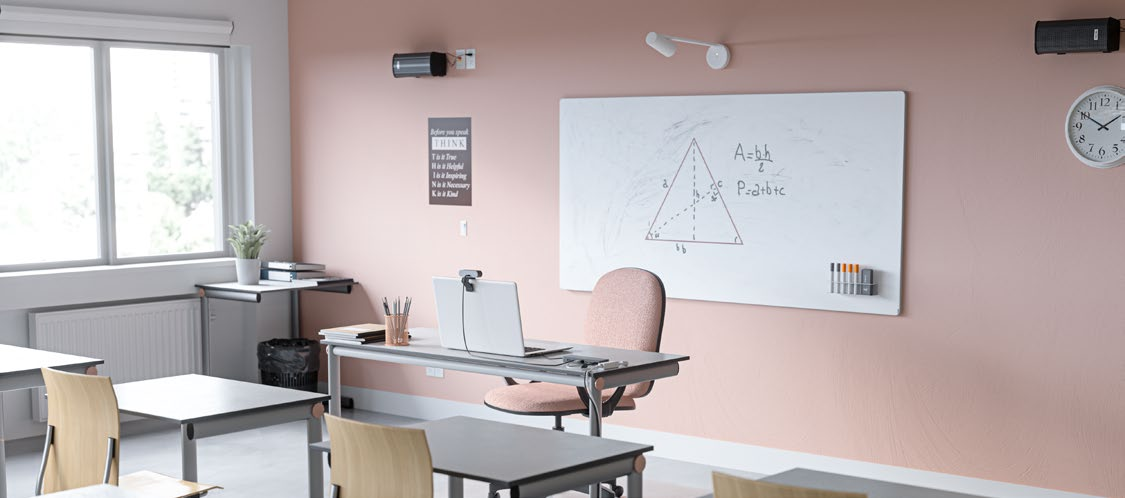
Logitech Scribe Mounting Tips: Positioning for Best Results
Proper positioning is crucial for optimizing the Logitech Scribe’s performance. Here are some expert mounting tips:
- Center on the Whiteboard: The Scribe works best when it is centered on the whiteboard, providing a full view of the writing surface.
- Consider Lighting: Avoid placing the Scribe near windows or light sources that may cause glare or reflections on the whiteboard.
- Secure the Mounting: Ensure the device is mounted firmly to prevent any wobbling, which could distort the captured image.
Taking these precautions will save you from alignment issues and ensure your whiteboard content is captured clearly.
Avoiding Common Logitech Scribe Errors
Even with detailed instructions, some common mistakes can occur during installation. Here’s what to watch out for:
- Incorrect Alignment: Failing to align the Scribe perfectly can lead to slanted or cropped images. Use a level tool to get it right.
- Ignoring Software Updates: Always check for software updates during setup. Outdated software can cause connectivity and performance issues.
- Cable Management: Messy cables not only look unprofessional but can also lead to connection problems. Use clips or ties to organize them.
By keeping these points in mind, you’ll avoid the most frequent setup errors that users face.
Logitech Scribe Calibration Tips: Getting the Perfect View
Calibrating your Logitech Scribe ensures it captures and displays your whiteboard content accurately. Here’s how to achieve optimal calibration:
- Run the Calibration Tool: Use the Logitech Scribe app to run the built-in calibration tool. It will adjust the camera angle and focus automatically.
- Test with Sample Content: Write on different parts of the whiteboard to see if the Scribe captures it evenly. If adjustments are needed, fine-tune the calibration manually.
- Check for Glare: After calibration, review the display for any glare or reflections and adjust the lighting if necessary.
Effective calibration makes a noticeable difference in the clarity and precision of the images your audience sees.
Logitech Scribe Troubleshooting Advice
If you encounter issues during setup, don’t panic. Here are some troubleshooting tips:
- No Power or Connection: Double-check the power cables and network connection. If the Scribe doesn’t power on, try a different outlet.
- Blurry or Distorted Images: This usually indicates a calibration issue. Re-run the calibration tool and ensure the device is properly aligned.
- Connectivity Problems: Make sure your network is stable and the device is connected to the correct Wi-Fi or Ethernet connection.
These quick fixes address most common issues and get your Scribe back in working order.
Logitech Scribe Integration Tips: Connecting with Other Systems
The Logitech Scribe is designed to integrate seamlessly with popular conferencing tools like Zoom and Microsoft Teams. Here’s how to make the most of these integrations:
- Follow Setup Guides: Most conferencing platforms have specific instructions for integrating the Scribe. Follow these to avoid compatibility issues.
- Test Before Meetings: Run a test session to check that the Scribe is working correctly with your chosen platform.
- Update Regularly: Keep both your conferencing software and the Logitech Scribe app updated to avoid bugs and ensure smooth integration.
Successful integration enhances the functionality of your device, allowing for a more interactive and engaging experience.
Logitech Scribe Software Configuration
Proper software configuration is essential for getting the best results from your Logitech Scribe. Here’s what you should focus on:
- App Settings: Adjust settings in the Logitech Scribe app to match your environment. You can configure things like camera zoom, focus, and brightness.
- Pairing with Multiple Devices: If you’re using the Scribe across different rooms or setups, ensure each device is properly paired and labeled for easy identification.
- Sync with Conferencing Tools: Ensure that the app is correctly synced with your video conferencing software for a flawless presentation.
Taking the time to configure the software to your preferences will make your experience smoother and more effective.
Wrapping Up: Best Practices and Final Thoughts
Optimization and installation of the Logitech Scribe doesn’t have to be daunting. By following the steps and tips outlined in this guide, you can avoid common pitfalls and ensure a successful setup. Remember, preparation and attention to detail are key when installing tech devices. From careful mounting to precise calibration, each step contributes to better performance and a more enjoyable user experience.
Conclusion
Installiation of the Logitech Scribe may seem like a technical challenge, but with the right preparation and guidance, it becomes a manageable task. By following this comprehensive guide, you can avoid common mistakes and get the most out of your device. From choosing the ideal mounting position to properly configuring software settings, each step plays a crucial role in optimizing the performance of your Logitech Scribe. With careful attention to detail and the tips shared above, you’ll enjoy seamless operation and crystal-clear whiteboard sharing in your meetings or classrooms. Remember, the key to a successful setup is not just in the installation itself but in ongoing maintenance and regular software updates. Happy installing!
FAQs
Mount the Scribe at a height that centers the device on your whiteboard for optimal coverage, typically 4 to 5 feet from the ground.
Position the Scribe away from direct light sources like windows and use softer ambient lighting to minimize reflections.
Yes, but ensure the whiteboard surface is smooth and non-reflective for the best results.
Check for updates monthly to ensure you have the latest features and bug fixes.
Verify your network connection and restart both the device and the conferencing software to re-establish the link.